How to Fill the Vietnam Pre-Arrival Form
Complete step-by-step walkthrough for prearrival.immigration.gov.vn. Takes roughly 10 minutes with your documents ready.
Disclaimer: This is an independent guidance service. The official government portal is prearrival.immigration.gov.vn. For E-Visa applications, visit evisa.gov.vn. We are not affiliated with the Vietnamese government. This form applies to arrivals at SGN (Tan Son Nhat), PQC (Phu Quoc), HAN (Noi Bai / Hanoi), DAD (Da Nang), and CXR (Nha Trang). See the U.S. Embassy Vietnam notice for the official announcement.
Have these ready first.
Passport
In hand. Check your passport type, number, expiry date, and full name as printed.
Visa or entry document
E-Visa number, exemption certificate, or ABTC number. Know your exact visa type.
Flight confirmation
Operating carrier flight code and scheduled arrival date at SGN.
Accommodation address
Full hotel address including province, city, ward, commune, and street.
Not sure what you need? Check the full requirements checklist →
4 steps to complete the form.
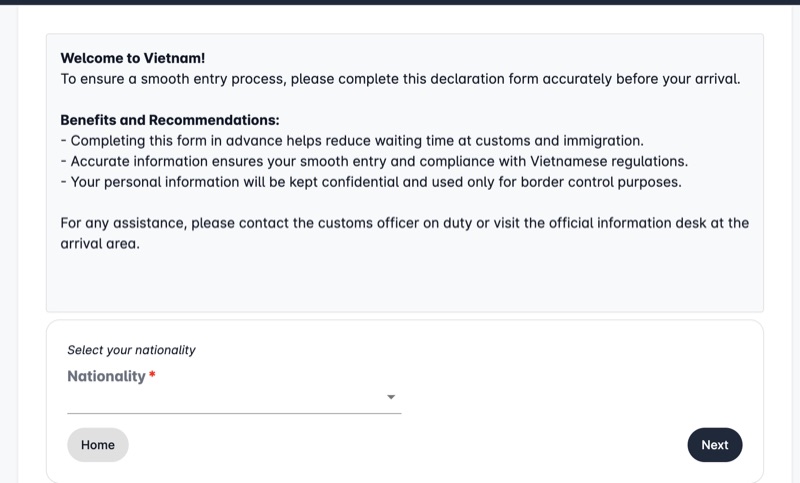
Select nationality & start
Navigate to the official portal at prearrival.immigration.gov.vn. Read the welcome screen instructions carefully. Select your nationality from the provided dropdown menu, then click Next to proceed.
⚠ This form applies to arrivals at SGN (Tan Son Nhat), PQC (Phu Quoc), HAN (Noi Bai / Hanoi), DAD (Da Nang), and CXR (Nha Trang). If you are landing at a different airport, check the latest requirements.
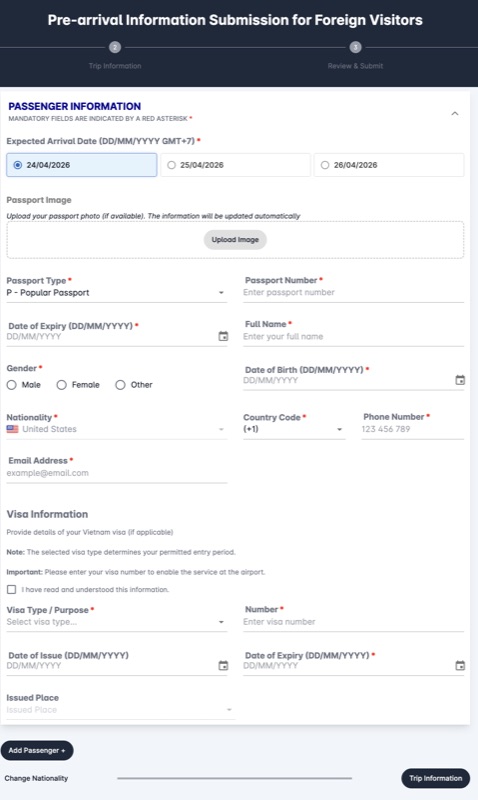
Passenger information
Select your Expected Arrival Date from the pre-populated options. Optionally upload your passport photo to auto-fill personal details. Enter your Passport Type, Passport Number, Date of Expiry, Full Name, Date of Birth, Gender, and Nationality. Provide your phone number (with country code) and email address. In the Visa Information section, select your exact visa type from the dropdown and enter your visa number, issue and expiry dates, and the issued place. To include family members, click "Add Passenger +".
⚠ Match your name exactly as it appears in your passport MRZ. Do not abbreviate or reorder names.
⚠ Select the visa type that matches your entry document exactly. A wrong selection causes a mismatch at immigration.
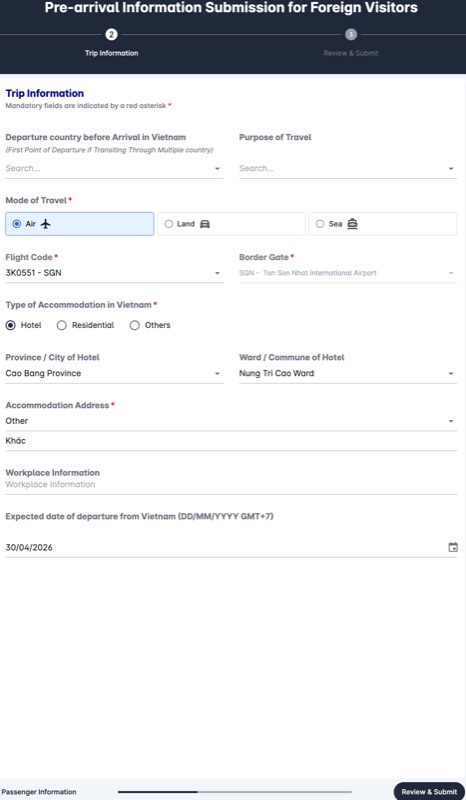
Trip information
Enter your departure country before arriving in Vietnam. Select your Purpose of Travel from the dropdown, and choose "Air" as your Mode of Travel. Select your Flight Code from the dropdown list — this filters automatically based on your selected arrival date. Choose your Border Gate from the dropdown (SGN, PQC, HAN, DAD, or CXR depending on your arrival airport). Select your accommodation type, then use the dropdowns to input Province/City and Ward/Commune. Enter the complete Accommodation Address. Finally, enter your expected departure date from Vietnam.
Purpose of Travel options include: Tourism, Business, Study, Working, Transit, Visiting relatives, Medical treatment, and Other. Most leisure travelers select Tourism.
⚠ "Departure country" means the country your last direct flight to SGN departed from — not your home country. Flying London → Dubai → SGN means you enter the UAE, not the United Kingdom.
⚠ Flight code dropdown filters by date — if your flight is missing, first check your arrival date in Step 2.
⚠ You must provide a complete accommodation address — not just the city or hotel name.
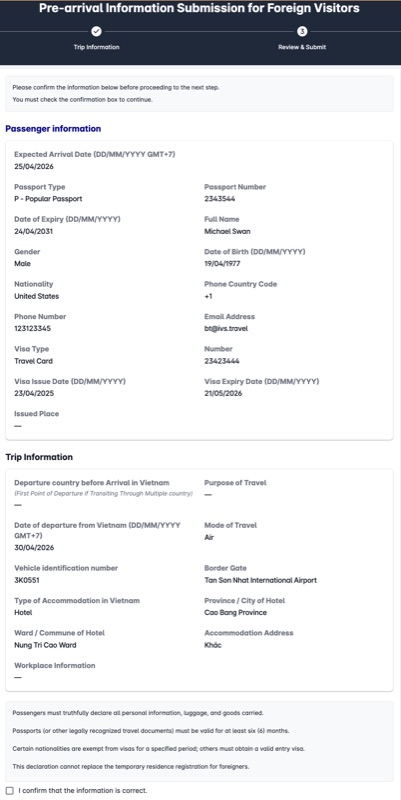
Review & submit
Check every detail against your physical passport and booking confirmation, then submit. The result page displays a QR code — screenshot the full page or download the PDF immediately. Show it at airline check-in before boarding and to the immigration officer on arrival at SGN.
⚠ Screenshot the full QR code result page immediately after submission — this is your official declaration record.
What happens next?
Confirmation screen
Once you click submit, the system generates a confirmation on the Result screen in Step 4. Save a clear screenshot or download the PDF immediately. There is no separate approval email or waiting period — your successful submission is your completed declaration.
Airlines on SGN routes verify the form at the check-in desk before issuing your boarding pass. Have the QR ready before you reach the counter.
Show this confirmation screen to your airline check-in agent before boarding and to the immigration officer upon arrival at SGN.
Print or digital?
Digital confirmation on your smartphone is accepted at most check-in counters and SGN immigration. However, we strongly recommend carrying a printed backup in case of dead battery or no connectivity upon arrival. Display the full page — a cropped or partially obscured QR code will not scan.
To print: open the confirmation Result page and print directly from your browser.
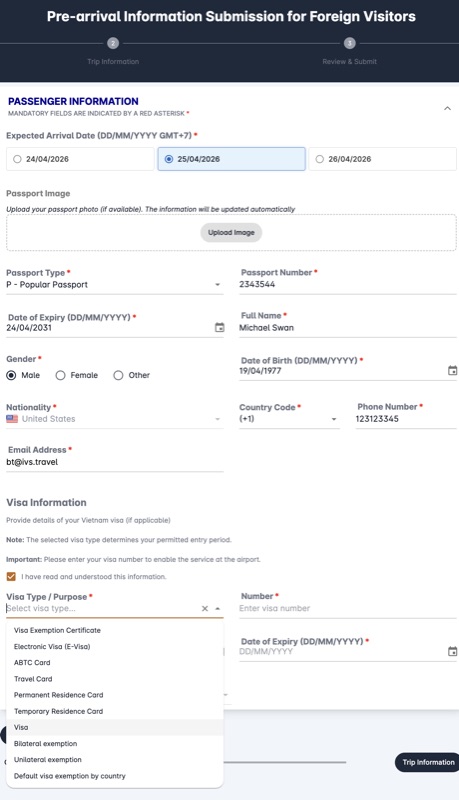
Visa type dropdown — select the option that matches your entry document exactly.